Create your own Hello world
- Create Mission script
- Get Moose
- Create the mission
- Add Moose to the mission
- Add the mission script
- Test the mission
- Update mission script
- Update Moose
- Next step
This page will lead you step by step through the process of creating a mission with MOOSE. This time we include a simple mission script, which sends only a “Hello world” message to all players. But the steps are the same to add another mission script, which will do whatever class(es) you want to use.
Create Mission script
At first we will create the mission script. It is a simple text file and can be changed with a lot of different tools. Theoretically even the Microsoft Notepad editor can be used. But it lacks a lot of features, which helps you to avoid errors.
For this guide we suggest you to download, install and use Notepad++.
Windows hides filename extensions by default. So when you create a text file and name it
hello-world.luait’s name ishello-world.lua.txtin reality. You must activate the display of the file name extension. Open aFile Explorer, switch to menuViewand find the optionFile name extensionsin the sectionShow/hide. Activate it.
- Open a File Explorer.
- Go to the subfolder
Missionsof your Saved Games folder. - Create a new text file and name it
hello-world.lua. -
Add the following content and save the file:
MESSAGE:New( "Hello World! This messages is printed by MOOSE", 35, "INFO" ):ToAll()
Get Moose
To download Moose click on the following link:
Press Ctrl + S to save the file on your hard disk next to your mission script.
Create the mission
- Start DCS.
- In the main menu choose
MISSION EDITOR. - Click on
create new mission. - In the dialog
NEW MISSION SETTINGS:- Choose map
Caucasus. - In the drop box upper left choose
Modernas coalition preset. - Click on
OK.
- Choose map
- The mission editor will load with a fresh new and empty mission.
- Click on
Filein the menu bar andSAVEor PressCtrl + S. - Open
My Missionsand save the file with the namehello-world.miz.
Add Moose to the mission
-
On the left side activate
TRIGGERS: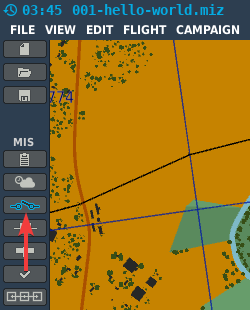
- On the right side the
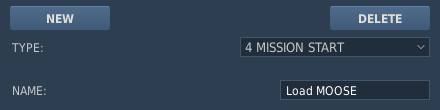
TRIGGERSdialog opens with a lot of options. - Click on
NEW, choose4 MISSION STARTas TYPE. - Give it the
Load MOOSEas NAME. - Leave the EVENT option set to
NO EVENT. -
Optional: Choose a color for easy recognition (e.g. yellow).
-
In the middle part the
CONDITIONSwill be shown. For this trigger we do not configure any conditions.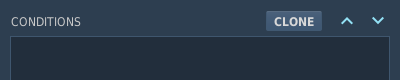
The trigger type
4 MISSION STARTdoes not supportCONDITIONS.
SoCONDITIONSmust left blank when using it.
If you add a condition the trigger will never be executed!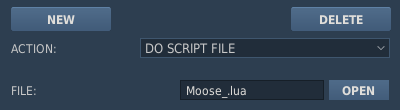
- On the right side
ACTIONSis shown. - We need to click on
NEW. - Choose ACTION
Do SCRIPT FILEand ignore all other actions. - Click OPEN and navigate to the downloaded
Moose_.luafile. -
The result should look like this:

Add the mission script
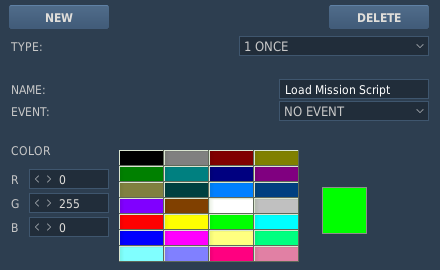
- Click on
NEW, choose1 ONCEas TYPE. - Give it the
Load Mission Scriptas NAME. - Leave the EVENT option set to
NO EVENT. - Optional: Choose a color for easy recognition (e.g. green).
-
The result should look like this:
-
Switch to the middle part, the
CONDITIONSsection.
For this trigger we add one condition: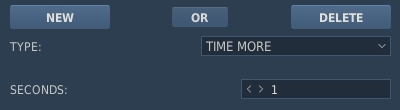
-
The combination of
1 ONCEwithTIME MORE(1)will ensure, that the mission script is executed 1 second after the mission is started. - On the right side under
ACTIONSyou need to add the script: - Click on
NEW. - Choose ACTION
Do SCRIPT FILE. - Click OPEN and navigate to the created
hello-world.luafile.
Most important is the fact, that the mission script (
hello-world.lua) is executed afterMoose_.lua, because the mission script needs the classes defined inMoose_.lua. And they are only available whenMoose_.luais executed before the mission script.
Test the mission
- Save the mission again.
- Click on the green Fly mission cirlce on the left tool side bar.
- It is an empty mission, so skip
BRIEFINGwithSTARTand thenFLY. -
You spawn as a spectator. After some seconds you will see this message in the upper right corner:

This is the same result as already seen in the last chapter, but this time you have create everything on your own.
You can use this mission as a template for your own missions. So you don’t need to do alle these steps again and again.
Update mission script
- Open the
hello-world.luawith Notepad++ again. - Change the text a little bit, like
Hello Dude! ...and save the file. - Run the mission again.
- The text will not be changed in the mission. Why?
The mission editor copies the script into the mission file when you add it. Every change on the script file on your hard disk is not recognized by mission editor. You have to add the file after each change again!
There is also another method available to dynamically load mission scripts. But this method has some brawbacks and will be explained in the advanced section.
Now we add the mission script again:
- On the left side of the
TRIGGERSdialog click onLoad Mission Script. - On the right side under
ACTIONSyou need to add the script again:- Click OPEN and navigate to the created
hello-world.luafile.
- Click OPEN and navigate to the created
- Save the mission and test it again.
- Now the new text should be shown.
Update Moose
Moose is constantly being developed so that new functionallity is added or existing errors are corrected. Also from time to time changes of the DCS scripting engine comes with a new DCS version. It may therefore be useful or necessary to update Moose.
- To update Moose download it again and add it again in the same way you did with the mission script in the last step.
Next step
Let’s move on to the demo missions.